Level up your business with team@relayzo.com

Installation Guide

Relayzo

Relayzo – Installation Guide

Welcome to Relayzo! This guide will walk you through the installation process for your email marketing application. Please follow the steps below carefully. If you’re not familiar with technical terms, don’t worry—this guide is designed to make the process as simple as possible.

System Requirements

Before starting, ensure that your hosting environment meets the following requirements:

  • Operating System: Linux (Windows may work but is not officially supported)
  • Web Server: Nginx or Apache
  • PHP Version: 8.1 or higher
  • Database: MySQL 8.0 or higher
  • Cron Jobs: Access to Linux cron jobs (web-based cron jobs are not supported)
  • Required PHP Extensions:
    • BCMath
    • Ctype
    • Fileinfo
    • JSON
    • Mbstring
    • OpenSSL
    • PDO
    • Tokenizer
    • XML
    • curl (enabled)
    • zip (enabled)
    • GD (enabled)
    • IMAP (enabled)

Installation Steps

1. Copy the Files

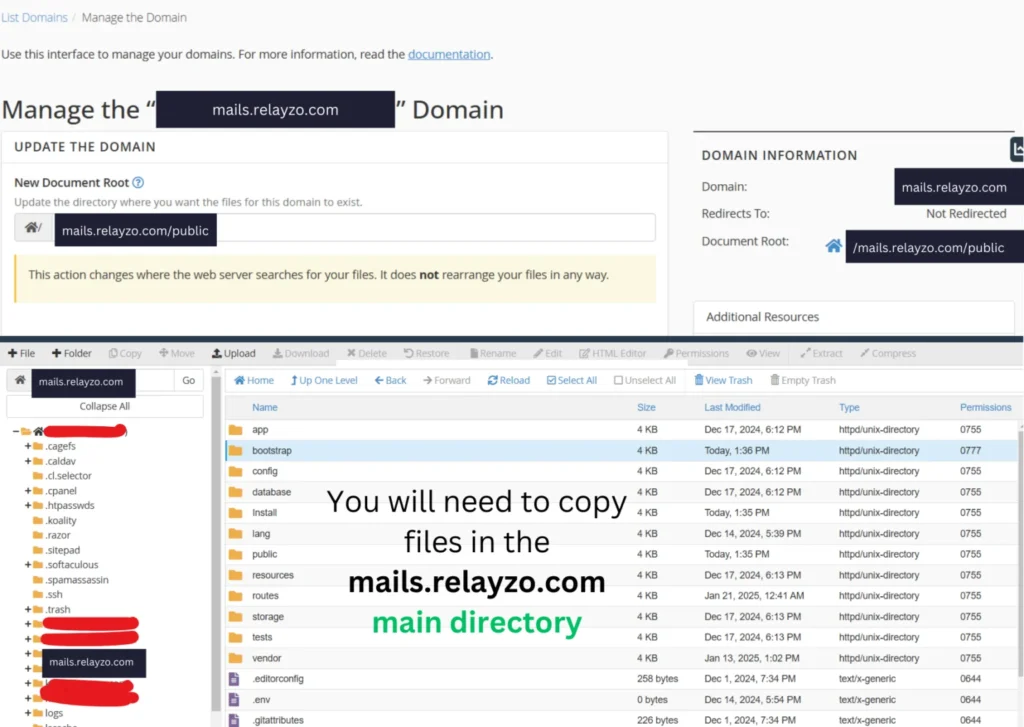
Transfer all files from the Install folder to the root directory of your domain. The root directory is where your website’s files are stored. If you’re using a control panel like cPanel or FTP software, you can simply drag and drop the files into the directory.

– If your root directory is www/public_html/relayzo, then the domain path should be www/public_html/relayzo/public, the index.php file will be located within the public folder.

such as:
👉 yourdomain.com

or

👉 mail.yourdomain.com

Ensure the domain/subdomain path points to:
👉 yourdomain.com/public

or

👉 mail.yourdomain.com/public

Upload all the files to:
👉 yourdomain.com

or

👉 mail.yourdomain.com

The installer will be accessible without the public directory at:
👉 yourdomain.com/install/setup.php

or

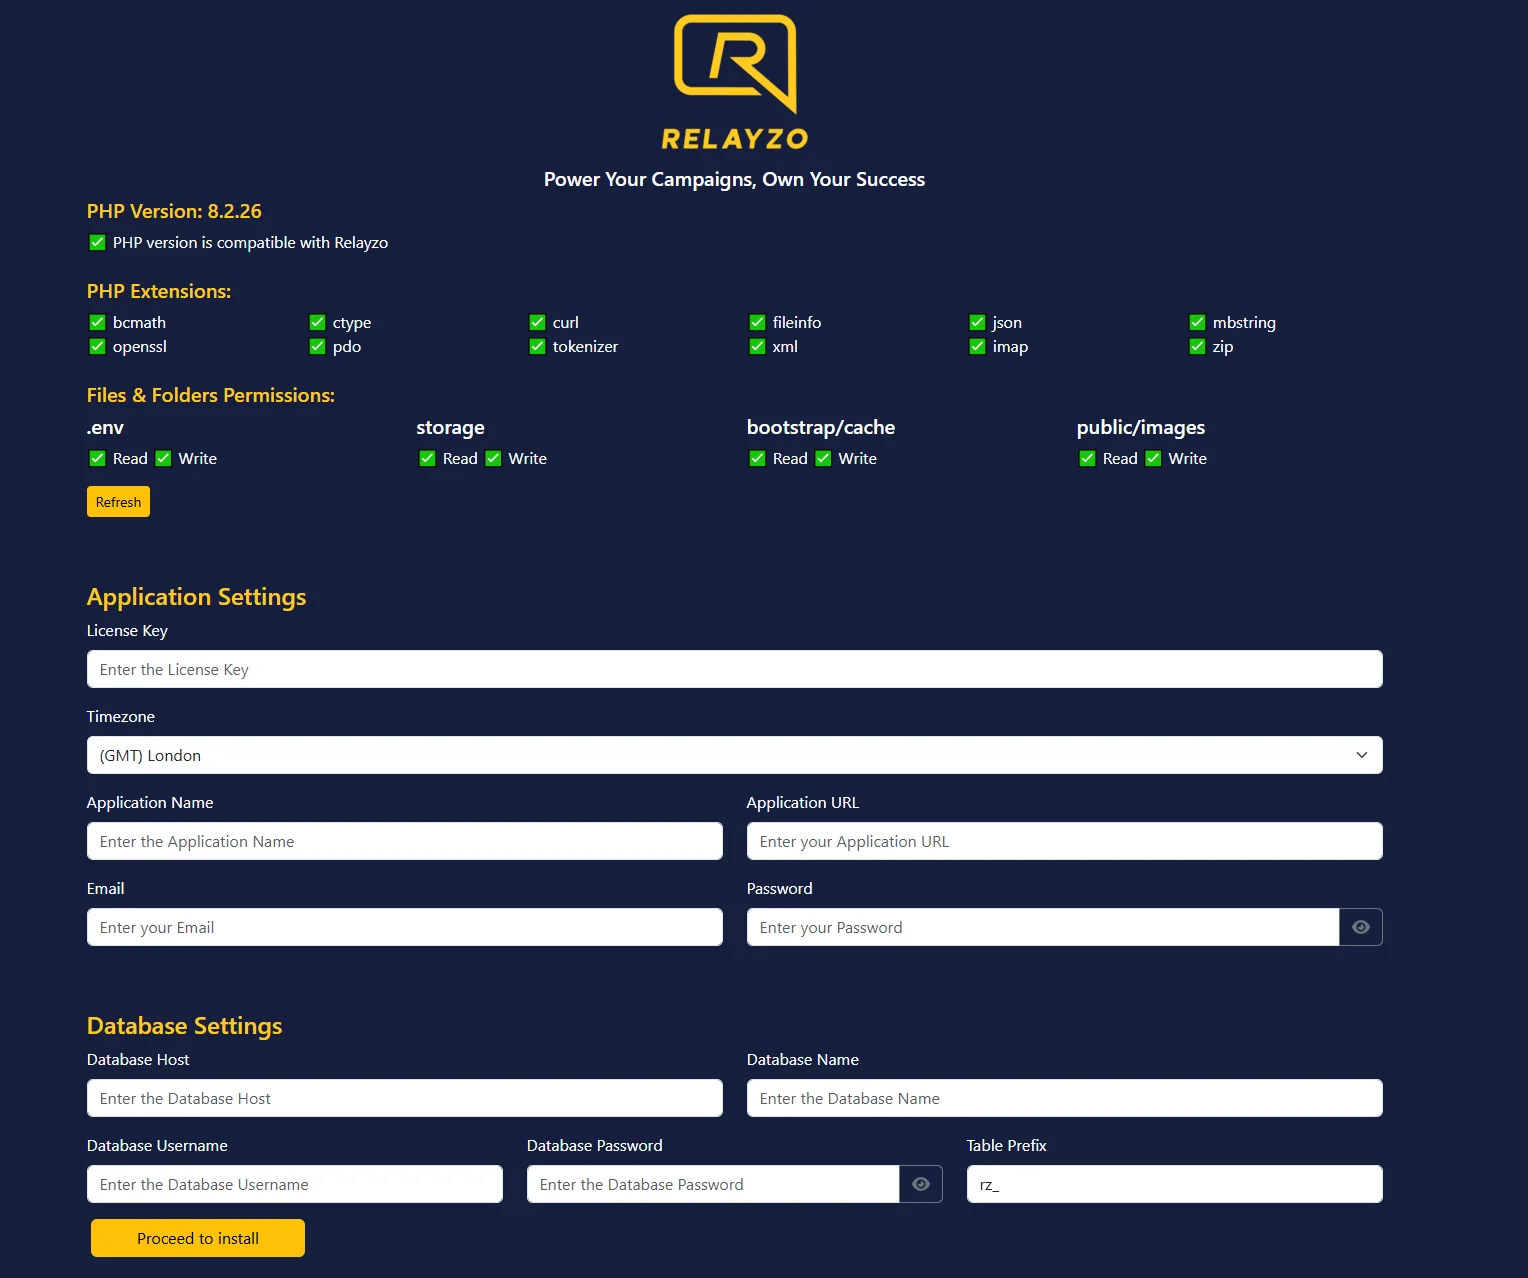
👉 mail.yourdomain.com/install/setup.php


*******************************************************************************************************************************************************************
Make sure that your domain is pointed to the public folder within the root directory. This is where the index.php file is located and should be the entry point for your application.
*******************************************************************************************************************************************************************

2. Access the Setup Page

Open your web browser and go to the installation page by entering the following URL:

https://yourdomain.com/install/setup.php

For example, if your domain is https://example.com, navigate to:

https://example.com/install/setup.php

3. Set File and Folder Permissions

You need to ensure that certain files and folders have the correct permissions to allow the application to save data and function properly. Set the following files and directories to allow writing:

  • .env
  • storage
  • bootstrap/cache
  • public/images

Note: If you’re unsure how to do this, follow these instructions:

      # Navigate to your Relayzo root directory
cd /path/to/your/relayzo

# Set write permissions for the .env file
chmod 777 .env

# Set recursive write permissions for the storage, bootstrap/cache, and public/images directories
chmod -R 777 storage bootstrap/cache public/images

The chmod -R 777 command provides read, write, and execute permissions. The -R flag ensures the change is applied recursively to all files and subdirectories inside the specified directories.

If you’re still unsure about how to set the permissions or run these commands, contact your hosting provider or refer to their documentation for setting file permissions.

4. Provide Installation Details

During the installation process, the setup wizard will ask for important information. Gather the following details before starting:

  • License Key: Provided when you purchased the application.
  • Timezone: Your local timezone (e.g., UTC, EST).
  • Application Name: The name of your application (e.g., Relayzo).
  • Application URL: Your website’s URL (e.g., https://example.com).
  • Admin Email: The email address for the admin account.
  • Admin Password: A secure password for the admin account.
  • Database Settings:
    • Database Host: Usually localhost
    • Database Name: Create this in your hosting control panel
    • Database Username
    • Database Password
    • Table Prefix (optional): e.g., rz_

5. Complete the Installation

Once you’ve entered all the required details, click the Proceed to Install button. The installation process will begin and should take about 2–3 minutes. Please avoid closing the browser or navigating away during this time.

6. Set Up Cron Jobs

After the installation is completed, you will need to configure cron jobs. These are scheduled tasks that automate essential processes for the application. Detailed instructions will be provided after installation.

7. Start Using Relayzo

Congratulations! Your application is now installed and ready to use. Log in with the admin email and password you set up to start exploring Relayzo’s features.

If you have any questions or run into any issues, don’t hesitate to reach out to our support team at team@relayzo.com for prompt assistance.